Rugby Union can be a pretty confusing game for new fans, but this article should help you understand the different positions.
Below is an image illustrating the classic Rugby Union positions:
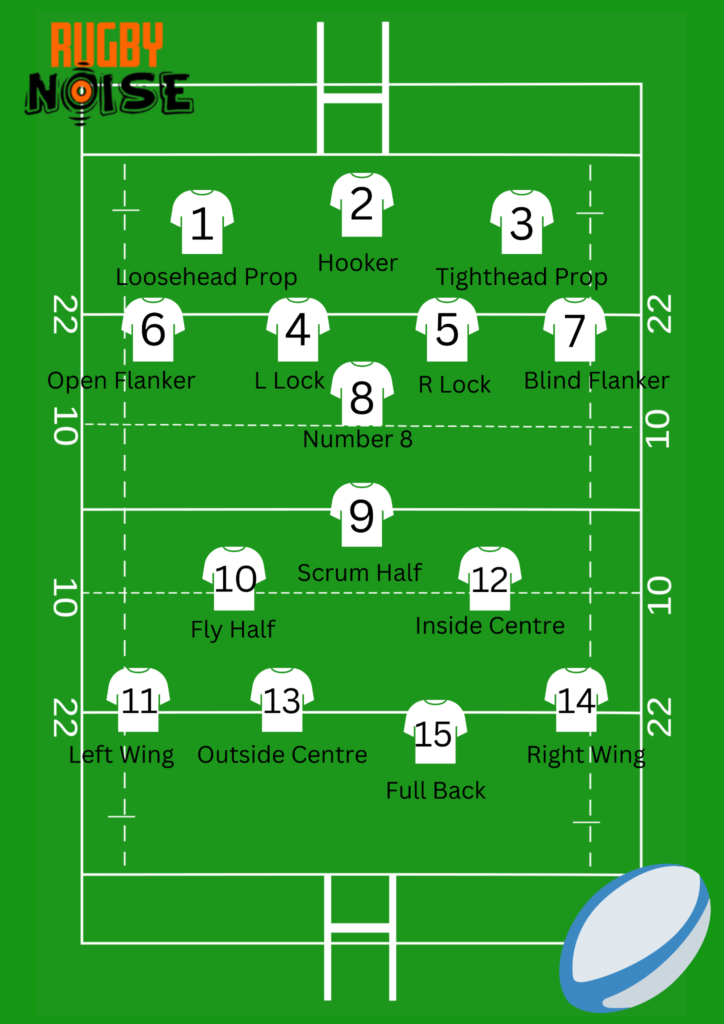
Classic Rugby Union Positions, illustrated.
Loosehead and Tighthead Props Explained
The props wear numbers 1 and 3 and tend to be some of the heavier people on the team. They make up the front row with the Hooker which is their position in the scrum. A prop also helps to lift jumpers in the lineout as well as occasionally doing some of the ball carrying, usually used as a battering ram in attack as they are usually not the most mobile.
Hooker Explained
The Hooker is also on the front row but lines up in between both props for the scrum. In the scrum, their job is to hook the ball backwards towards their side after it has been put in. At lineout time, Hooker’s are crucial as they are the ones who have to throw the ball in and are punished if the ball does not go straight.
Some of the best players in the world at the moment are Hookers including Malcolm Marx, Bongi Mbonambi and Julien Marchand. Hookers wear number 2.
Second row Explained
The second-row players wear 4 and 5 and are also known as locks. They tend to be the tallest players on the team, tasked with collecting the high ball in the lineout while also trying to steal it off the opposition.
In the scrum, the Second Row are incredibly important in driving the Front Row and they are needed to create a powerful and cohesive scrum. Eben Etzebeth and Maro Itoje are two of the best second-row’s in the world, with both of them standing at over 6ft 5in, with Etzebeth a whopping 6ft 8in.
Flankers Explained
On the sides of the scrum, you will find the flankers with numbers 6 and 7. Number 6 is the Blindside Flanker while number 7 is the Openside Flanker. The Blindside Flanker tends to do a lot of similar jobs to the Second row, being more physical than the Openside Flanker.
The Openside Flanker is probably the most versatile player on the pitch. He needs to be fast, agile, strong, skilful and a good tackler and jackeler. It is why so many of the best players in the world and of all time are Openside Flankers. Today, the position is dominated by players like Josh Van der Flier, Michael Hooper and Pieter Steph du Toit.
Number 8 Explained
The person at the very back of the scrum, a Number 8 tends to be the most explosive and powerful ball carrier that a side has. They will tend to be the first option in attack for most teams due to their speed, power and aggression. Their roles are similar to a Flanker.
It is why both Flankers and the Number 8 make up the back row. A Number 8 needs to make penetrating runs through defences just like players like Ardie Savea, Duane Vermeulen and Gregory Alldritt do.
Scrum Half Explained
Usually the smallest player on the pitch, the scrum half wears number nine. His main role is passing, facilitating the attack as it is usually him who passes the ball from a ruck. The Scrum Half acts as the link between forwards and the backs as they are the ones who usually set the pace of the team. A top-level scrum half can take a team from good to great.
Antoine Dupont is by far the best scrum half and player in the world right now, having won World Rugby Player of the Year.
Fly Half Explained
The most important player on the team, the Fly Half wears number 10. They will be the one pulling the strings for the team. The Fly Half is usually in charge of kicking as well. Your Fly Half needs to be a vocal leader who can organise the backline in defence and easily spring attacks.
Fly Halves tend to be very well known thanks to their importance on the pitch. In the past players like Dan Carter and Johnny Wilkinson have excelled from Fly Half. At the moment, we have legends like Johnny Sexton, Beauden Barrett and Owen Farrell leading from the position.
Centres Explained
Usually the most powerful and biggest backs, the centres are split into Inside Centre who wears 12 and Outside Centre who wears 13. The 13 tends to be the stronger, more dynamic runner while the 12 will be more important in the tactics of attack as they are the ones standing next to the Fly Half.
Centres are usually the first line of attack when moving the ball through attacks, needed to be physical in attack and defence. It is why we have seen players like Ma’a Nonu, Manu Tuilagi and Gael Fickou excel from the position.
Wingers Explained
The widest players in attack, the wingers will usually also be the fastest players on the team. Wearing 11 and 14, the winger’s main goal is to be a try-scoring threat, with wingers’ quality often judged by how many tries they score.
The position requires you to have the ability to easily beat a man and finishing attacks is a must. The clinical nature of Jonah Lomu is what made the man a legend from the wing. Today, we are seeing young stars like Louis Rees-Zammitt, Will Jordan and Sevu Reece dominate the position.
Fullback Explained
The Fullback is the very last line of defence in any team. So they need to be agile and powerful while making the right tackle can be crucial when there is no one behind you. There is also pressure from above, with the Fullback needing to be able to deal with high balls and kicking it themselves.
A very versatile position, Fullbacks are also tasked with being an extra winger in the attack. It is an extremely high-pressure position, but it has produced some legends and current stars. Players like Freddie Steward, Hugo Keenan and Stuart Hogg have all made themselves superstars from the position.